Manny Oyola, Jr., Technical Manager Eastern Region FL, Eagle Roofing Products
 Proper installation of hip and ridge roof tile is likely to be the difference between a roof that withstands the uplift pressures of a high wind event and one that fails to protect the building it covers. Let’s look at important components of properly installed hip and ridge tile.
Establishing the Wind Zone Requirements
Before designing and installing a roof, we must first know what the design speed requirements are for its location. Wind speed calculators available online (for instance, https://asce7hazardtool.online) can work very well in helping you determine the design requirements; however, it is critical to verify the building department’s set compliance requirements in the authority having jurisdiction. Once you have established design requirements, you can choose from one of four types of hip and ridge tile attachment methods. These methods are covered starting on page 14 of the FRSA-TRI Florida High Wind Concrete and Clay Tile Installation Manual and are code-compliant, by reference, in the standard region of the Florida Building Code.
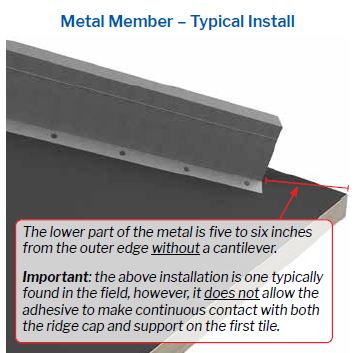
Once you have selected which type of material you will use for the structural support (see Hip and Ridge Attachment table below), you can then use the corresponding instructions from the Tile Manual. However, before we look at the methods listed in the Tile Manual, it is important to note that an installation method typically used in the field does not follow the methods listed in the Tile Manual: Now, let’s look at installation methods provided in the Tile Manual:
Metal Member – Set member in plastic cement or compatible sealant. Fasten 6” on center on each side of the metal flange with minimum 1-1/4” ring shank roofing nails. If mechanical attachment of the member is not used, install the member with foam per the manufacturer’s instructions.
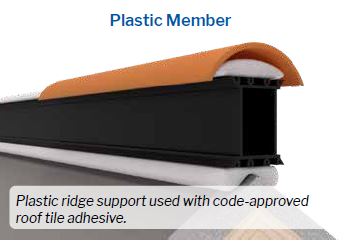
Plastic Member – Install the member with foam per the manufacturer’s instructions.
Wood Member – Fasten 18” on center with four #8 screws per metal strap or H-bracket. Each
attachment point shall have two fasteners on each side of the wood member. The fasteners shall be spaced evenly on the metal strap or H-bracket with
the attachment holes parallel to the hip or ridge. The straps and H-brackets shall be a minimum of 26 gauge. All materials must be compatible with each other. If mechanical attachment of the wood member is not used, install the member with foam per the
manufacturer’s instructions.
Mortar – When using foam or mortar field tile attachment, mortar can be used as a structural attachment. Place a full bed of pre-bagged mortar under the entire tile. Each tile must be fully embedded into the mortar. The field tile secured to the underlayment along with the mortar on each trim tile creates the structural bond. The entire cavity under the trim tile should be filled with approved mortar (see
Drawing FHW-18 above).
 Starter Tiles
Based on feedback we have received from contractors in the field, it seems that the following statement in the tile manual is often ignored or misunderstood:
Starter Tiles – All starter tiles must be secured at both ends of the tile either with mechanical fasteners, mortar and/or adhesive.
When the field tile is installed with foam or mortar, the starter tile may be installed with an approved mortar. If using a structural member, choose one of the following:
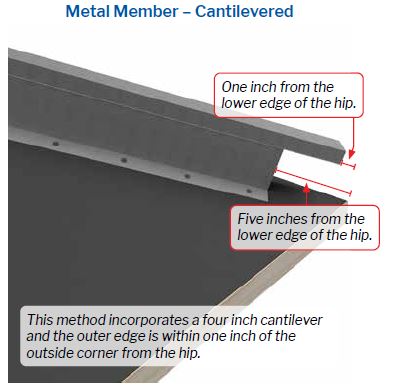
Metal Member – Place foam under starter tile per manufacturer’s recommendations or secure the head of the tile with one #8 screw and apply adhesive in the gap between the structural support and the tile. The member may need to be cantilevered to provide a base for the adhesive. The starter tile must make contact with the adhesive. See manufacturer’s recommendations.
Plastic Member – Place foam under starter tile per manufacturer’s recommendations.
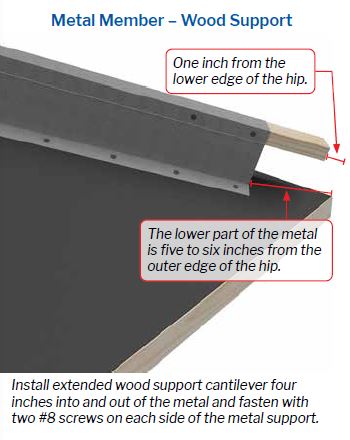
Wood Member – Place foam under starter tile per manufacturer’s recommendations or drill a hole in the lower third of the starter tile and secure with a mechanical fastener into the wood member a minimum of 1”. Seal the head of the fastener with a UV-resistant sealant. Adhesive may be used in lieu of a fastener as long as the wood member has been cantilevered to provide a base for the adhesive. The adhesive between the structural support and the tile must make
continuous contact with both the structural support and the tile. See manufacturer’s recommendations. The important word, which both the metal and
wood structural supports have in common, is “cantilevered.” A cantilever can be achieved using one of several methods while still meeting the intention of the manufacturer’s recommendations.
Conclusion
Using one of the hip and ridge attachment methods from the FRSA-TRI Tile Manual provides code-compliant options for installations in the standard Florida Building Code region. Proper installation can mean the difference between a home that withstands
a high wind event and one that does not. FRSA members receive one complimentary copy of the FRSA-TRI Tile Manual and additional copies are available at a discounted rate of $15 each. Members may also contact FRSA technical support at 800-767-3772 or silvers@floridaroof.com with code and building related questions about tile and other roof systems. The Tile Manual is currently in its sixth edition, using the ASCE 7-10 wind specifications. A new seventh edition will become effective a little over a year from now (12/31/2023) and will use whichever ASCE 7 specification is adopted by the
Florida Building Commission, probably ASCE 7-22. Many thanks to the members of the FRSA-TRI committee who dedicated much time and effort drafting the seventh edition Tile Manual.
FRM